Welcome to Fox! In this guide to getting started, we’ll cover the following:
- Creating an agent user
- Add a new client account
- Updating greeting, special instructions, and script
- Updating the Message
- Adding contacts
- Adding Your Brand Information
- Handling a sample call as an agent
- Using the agent screen and sending a message
- Handling a live call
- Performing a warm transfer
How to Create a New Agent User
The first thing to do is setup an agent user. You will be able to create as many agent or admin users as you want for reporting purposes, but the amount of agents that can login simultaneously depends on the amount of seats you’re paying for.
Step 1. Located on the left-hand side of your page, click on the Users icon from the menu.
Step 2. On the Users page, click Add Agent located to the right of the page.
Step 3. Fill in all the empty fields in the add agent form. For the password, you can create your own or, click on the key icon to generate a random password.

Step 4. Click on Add user to finish and move on to the final step.
Step 5. The Edit Agent modal pops up after clicking on add user. Choose a SIP account that is going to be your agent’s phone extension. Click on update to finish adding the new agent.
How to Add a New Client Account
Let’s add a client account so you can test out the system. This can be a test client or you can start the setup process for one of your real clients. Before going live with a real client, you’ll need to make sure your client’s phone number is forwarding to the number assigned so the Fox can start receiving calls on their behalf.
Step 1. On the left-hand side of the page, click on Client Accounts. Then mouse over to Add Account on the top right of the page.
Step 2. First, add the client details.
- Type in the client’s first name, last name, email, password, and company name. Keep in mind that the email and password will be used by the client to login in to their portal (if you allow them to have access). You can always change the password later.
- Forwarding Number – Select an available DID number that will become the inbound number tied to this client. Setting this up allows you to receive inbound calls from your client customers. Your client must forward their inbound number to this number when they’re ready to go live so you can receive the calls for them.
Step 3. The third step is to add the primary contact details. This will act as the default contact at the client for messages and transfers. You can always change this later. Check the Use the Client’s Name and Email to auto-fill info from client details. Leave the check box empty if you want to add different contact info.
Step 4. The next step is to add the client’s Configurations.
- If you haven’t already setup your own SMTP credentials, you can use the default ones we provide for you, and simply put your email in the reply-to box.
- Select the client’s time zone.
- For the outbound caller ID you may use the default number on your account by leaving it blank. (Find the default number by clicking the gear icon at the top right of the page. Then select system settings and click on outbound caller ID to view the number.) You may also use the forwarding number as your caller ID if you like.
How to Edit the Greeting, Special Instructions & Call Script
Once you complete the wizard, you’ll find yourself on the Home Tab where you can edit the Greeting, Call Script, and Special Instructions.
Greeting
Add the greeting by clicking on the pencil located to the right of the greetings box. You can insert variables such as the company name or agent name by clicking on the brackets below.
“Thank you for calling ABC Plumbing, this is Jennifer, how may I help you today?”
Special Instructions
Add the special instructions by clicking on the pencil located to the right of the box. You can insert variables such as the company name or agent name by clicking on the brackets below.
This is a place you can put any important information you want the operators to be able to see on a quick glance.
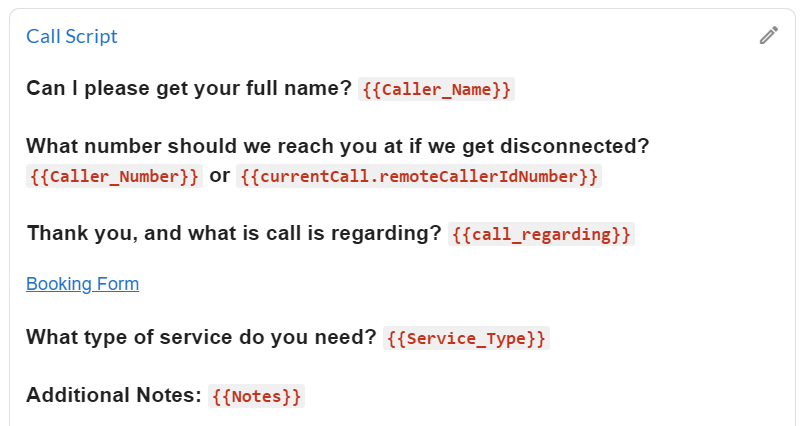
Call Script
You can view the default call script on the Home Tab, but to edit or add additional script blocks, you’ll need to navigate to the Scripts Tab. The calling script allows you to provide specifics on what you want your agents to say on behalf of each client as well as collect important information in fields that can be used in a Message or for reference later.
Fields are represented by brackets {{Field_Name}} and there are a number of default fields available.
You can also easily add new fields in the form of:
- Text field
- Text box
- Drop down menu
- Check box
For example, if you wanted to collect someone’s name, the first line of your script may look like this:
May I please get your full name? {{Caller_Name}}
Use the icons below to create new fields and copy and paste fields with brackets into your script. You can also insert variables or links to resources.

Scripting can be extremely powerful when you link script blocks together to create dynamic scripts and decision trees. This gives agents and customers a better and more flexible experience, especially for clients needing more complex assistance.
You can also insert transfer buttons in the script which will give you the option to include prioritized transfer groups so the agent will know who the call should be transferred to as well as what to do if the first choice doesn’t answer.
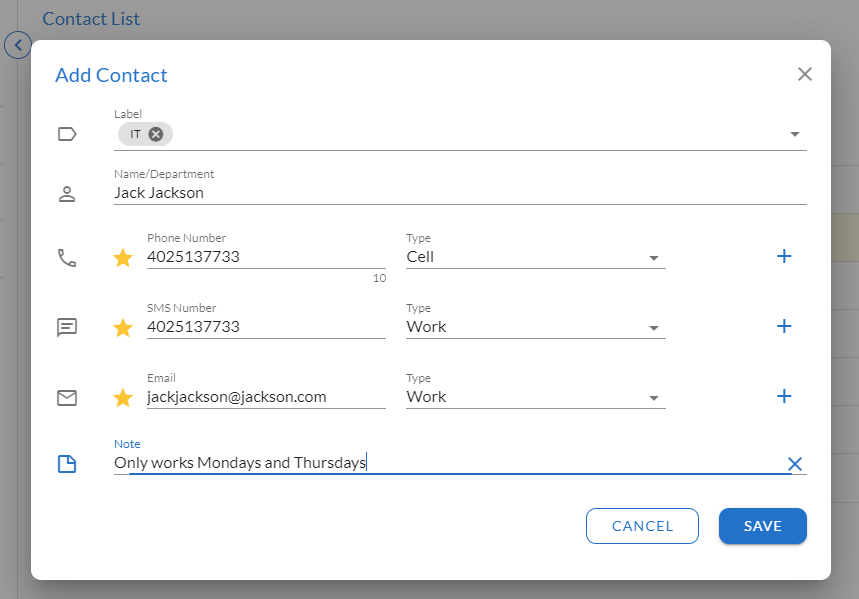
Adding a Contact
From the client screen, navigate to the Contacts tab. If you added one in your initial client setup, you’ll see your primary contact here. To add another contact, click the + Add Contact link on the right. You’ll have the option to include multiple phone numbers, sms numbers, and emails. The star indicates the primary method of contact.
Updating the Message
The Message refers to the text or email sent to the client to inform them of the call.
To customize the message you can send to your client contacts, click the dropdown menu on the top right and select Message Template. To customize who receives the message by default, uncheck the “Use Primary Contact” box, and add or remove text and/or email contacts.

The agent will have a chance to add or remove contacts as well unless you select “Auto Dispatch Message,” which means it will be sent automatically without the agent even seeing it.
You can also disable the sending of messages completely for a particular client by updating the slider button on the top right of the screen.
By default, you’ll see a {{gathered_information}} tag in the message box. This grabs all completed fields in the script and puts them in the message for you in easy to read format. You can customize what the message says or add additional information as well here.
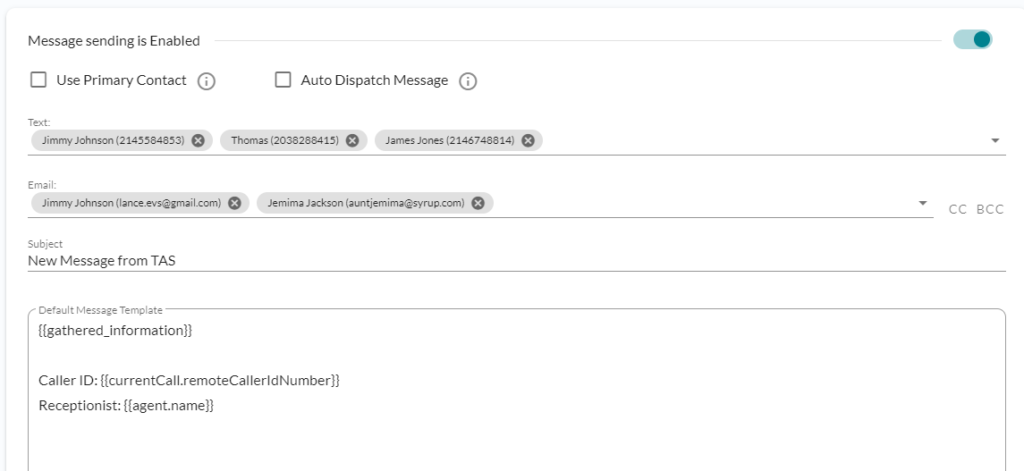
For advanced use cases, you’ll be able to customize a message on different script blocks as well.
Adding Your Brand Information
You can personalize the Fox with your own branding. To add your company name and logos, hover to the Settings icon on the top right, then click “Company Profile.”
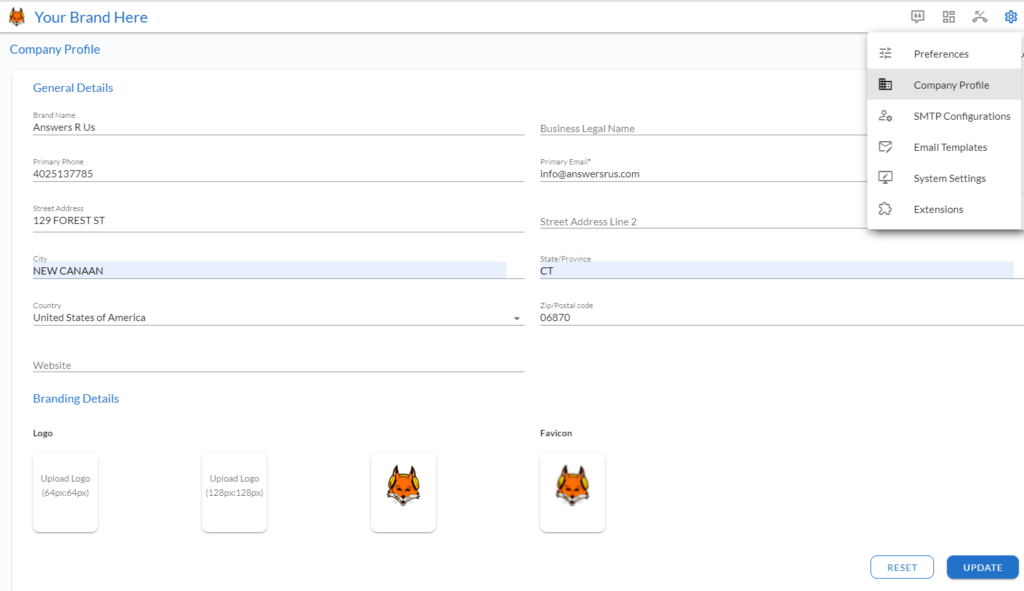
Update company information here as you see fit, and upload images for your branding.
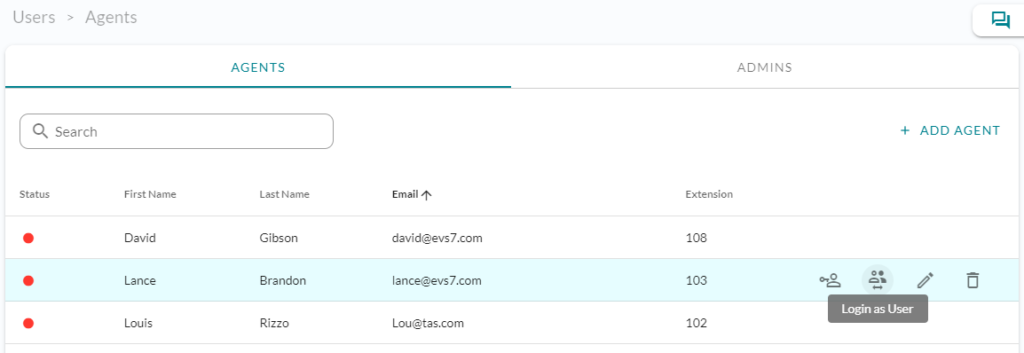
How to Login to the Agent (Operator) Screen
There are two different ways to login to the agent (operator) screen. Agents should simply login with their credentials at the same URL managers login at.
As a manager, you may log in as an agent from the manager portal by clicking the “Login as User” icon. This will open the agent screen in a new tab.
Using the Agent Screen
Upon login, you will see a dashboard with some statistics along with a spot for follow-ups if there are calls that are unfinished.
By default, you’ll be put into Ready mode when logging in to immediately start handling calls. Click the green play icon on the top of the screen to change it to Paused mode. This is useful when needing to go to the bathroom or take a break. The icons at the top of the screen represent:
- Log out
- Ready or Paused Mode
- My Dashboard
- Recent Calls History
- Missed Calls
- Profile Options
Handling a Call
Make sure you have a USB or bluetooth headset connected and are using Chrome or Edge browser.
Dial the sample client forwarding number that you set up, and you should see the incoming call on the left side of the screen. Click to accept the call and you’ll be prompted with a notification to allow the browser to use the microphone. Once you set the approval, you’ll be live on the call.
Note: You only have to approve your mic in your browser the very first time you take a call.
Notice that the client information including the greeting, client details, special instructions, and script specific to the sample client you created have popped onto the screen.
You can start entering information into the script, and then click on the Message icon on the call box on the left side of the screen. Here you can view or send the message via text or email to a client contact.

On the call box, you’ll also have options to place the call on hold, mute the call, blind or warm transfer the call, or end the call.
When the call ends, you can choose the disposition to mark what happened on the call. Some default dispositions include: Call Handled, Wrong Number, and Follow Up.
You can handle multiple calls by placing one call on hold and then clicking to accept another call. Then you can toggle back and forth between the calls.
Performing a Warm Transfer
If you need to warm transfer a call, simply click on the Warm Transfer icon on the call box to bring up a modal of client contacts. Choose the client contact you wish to transfer the call to, and this will initiate a call with the contact. This automatically puts the current call on hold.

Once you connect with the contact, you can speak with them and inform them of any information.
“Hi James, I have Jennifer on the line who would like to speak to someone about new service. Are you free to take this call now?”
To complete the warm transfer, click the “Merge” icon and choose the number of the original call. You’ll then be prompted to disposition each call.
Additional Agent Tabs
While often you won’t need to leave the first screen, you’ll have the option to visit other tabs:
- Timeline – This shows a history of previous interactions with this caller.
- Resources – See embedded websites, forms, or files
- Conversations – 2-way texting with client contacts in real time
- Contacts – See or search a list of all contacts associated with this client
- On-Call Schedule – View the daily or weekly schedule to quickly see who is on-call for a transfer
Congratulations, you’re well on your way to successfully operating your Fox TAS! This concludes the basics on getting started. For more in depth information on specific topics, please refer to other knowledge base articles.