Telephone Answering Machine

You likely use a phone and a computer to do your daily task at work, so why not combine the two tools? Turn your computer into a telephone answering machine in just three easy steps!

How a Computer Answering Machine Is Different?

While a traditional answering machine will accept missing calls and even greet the caller with a pre-recorded message, it is not nearly as convenient as a cloud-based solution. With a cloud-based solution there are no unnecessary lines or hardware, and the solution can be used on any computer with WIFI. 

Setting up Your Computer as a Telephone Answering Machine:

It’s as simple as one, two, three! Turning your computer into a telephone answering machine has never been easier with the help of telephone answering service software. You could be up and running within the day by using these three steps: 

  1. Get a Telephone Answering Software

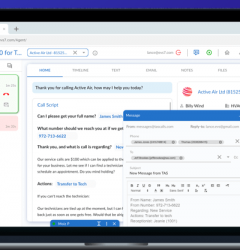
  2. Get started by getting a telephone answering service software. If you don’t know already, answering service software allows telephone answering services to handle calls for different clients. The Fox Answering Service Software with EVS7 is cloud-based and doesn’t require expensive hardware or separate vendors for phone calls. The cloud-based solution allows users to:

    • Manage client information
    • Create custom scripts
    • Use omni channel tools, like email and text
    • Have cloud-based security 
    • Manage users and seats 
    • View real time and historic calling reports
    • Use cloud call recording 
    • And so much more! 

    There is no software to install and no telephone lines are needed. You only need a computer, WIFI, and a headset. Having this solution means more flexibility and ease, not to mention fewer mistakes and more calls handled. With unlimited calling, no hidden per-minute charges or excessive usage fees cutting into your bottom line, you will be able to focus more on the client. 

  3. Setup your Clients

  4. Once you sign up, client information will need to be uploaded into the dialer. Here is a step-by-step on how this is done:

    1. Select ‘Add Account’ in the TAS and input the following information: the client’s first name, last name, email, password, and company name (Keep in mind that the client will be able to see this information, if you give them access to their portal.) You will also need to add an available DID that will become the clients inbound number. The client will need to forward their number to the DID when they are ready to go live. 
    2. Next you will add the primary contact details (This is the default for the client for messages and transfers.)
    3. Lastly, you will need to add the client configurations. This includes the
      •  SMTP credentials (there are default ones available, if you have not set up your own)
      • Selecting the clients time zone
      • Putting in the outbound caller ID 

    After the clients have been put into the portal, you can focus on creating custom scripts, uploading important forms, and more!

  5. Login to the Web App and Start Getting Calls

Once the client information has been input into the software, your agents will be able to upload important documents, create custom scripts and most importantly, start taking calls. When calls come in for each of your clients, based on Caller ID, a custom client screen pops up for your agent who answers the call. The agent will be able to personalize their greetings as if they are a member of each of your client’s staff. Agents can then transfer calls or take messages and send emails or text messages to those clients. When ready to begin work, your agents simply log in to your TAS online and can immediately start receiving calls.

See how to start an answering service business

Related Post

Recent Posts

First Call Resolution
Customer Service Metrics
Maintain Customer Loyalty
Customer Service Training
2022 Customer Service
Customer Service Tips
Call Center Agent Engagement

Recent Posts

First Call Resolution
Customer Service Metrics
Maintain Customer Loyalty
Customer Service Training
2022 Customer Service

Recent Posts

First Call Resolution
Customer Service Metrics
Maintain Customer Loyalty
Customer Service Training
2022 Customer Service